How to install Stable Diffusion on your computer

Table of Contents
- System requirements for running Stable Diffusion locally
- Step-by-step guide to installing Stable Diffusion
- Automatic full Stable Diffusion installation via Stability Matrix (step-by-step)
- What to do after installation
-
Frequently asked questions (FAQ) about installation and usage
- How do I connect external scripts or code to WebUI Forge via the API?
- How do I fix the “Torch NOT FOUND” error or dependency loading failures?
- How do I open the local Stable Diffusion interface if the browser did not launch automatically?
- What should I do if an “OutOfMemoryError” (CUDA out of memory) occurs during generation?
- I cannot solve the error—where can I get help?
- Which installation method should you choose?
Stable Diffusion is a free neural network for generating images from text descriptions. Downloading and installing Stable Diffusion can be challenging for inexperienced users, so we have prepared a detailed guide on how to install the neural network on a computer running Windows, macOS, or Linux. If you do not have a GPU or it is underpowered, check out renting servers with a GPU for AI or other neural networks for images.
System requirements for running Stable Diffusion locally
Unlike most other neural networks, Stable Diffusion can be used not only online but also installed on your own computer. This is both an advantage—you do not have to rely on the computing power of a third-party server—and a disadvantage—you need to have a relatively modern computer and go through the non-trivial process of installing the neural network locally. Therefore, before installing Stable Diffusion, make sure your computer meets the neural network’s minimum requirements.
The key components for working with Stable Diffusion are the GPU and its video memory (VRAM) capacity. All tensor and model processing takes place on the graphics chip.
Minimum and recommended PC specifications
| Component | Minimum requirements | Recommended configuration |
|---|---|---|
| GPU | NVIDIA with 4 GB VRAM (GTX 1050 Ti / GTX 1650) | NVIDIA with 12–16 GB VRAM (RTX 3060 12GB / RTX 4070 / 4080) |
| GPU architecture | CUDA support (NVIDIA). AMD and Apple Silicon (M1/M2/M3) are supported through workarounds (ROCm/MPS), but run more slowly. | NVIDIA CUDA (RTX 30xx / 40xx / 50xx). |
| RAM | 8–16 GB | 32 GB (especially important for loading large checkpoints). |
| Storage | HDD/SSD with at least 20 GB of free space. | NVMe SSD (at least 100 GB free for models and cache). |
| OS | Windows 10/11 (64-bit) or Linux (Ubuntu 22.04/24.04). | Linux (Ubuntu/Debian)—usually faster thanks to a clean CUDA stack. |
Which Stability AI model to choose
The official stabilityai hub on Hugging Face contains not different programs, but different neural network architectures and weights released over the years. Each version has its own VRAM requirements:
-
Entry level (4 GB–8 GB VRAM):
- Stable Diffusion 1.5 (stable-diffusion-v1-5): The classic choice. Uses as little as 4 GB of VRAM in
--lowvram/--medvrammode. Generates images at the base resolution of 512x512. It has the largest ecosystem of custom checkpoints and ControlNet models.
- Stable Diffusion 1.5 (stable-diffusion-v1-5): The classic choice. Uses as little as 4 GB of VRAM in
-
Mid-range (8 GB–12 GB VRAM):
-
SDXL (stable-diffusion-xl-base-1.0): The standard for 1024x1024 resolution. Requires at least 8 GB of VRAM (FP16/FP8).
-
SD 3.5 Medium (stable-diffusion-3.5-medium): A modern model with 2.5 billion parameters. Runs comfortably with 8–12 GB of VRAM.
-
-
Advanced level (16 GB–24+ GB VRAM):
- SD 3.5 Large (
stable-diffusion-3.5-large): A flagship model with 8B parameters. In full-precision format (FP16), it requires 16–24 GB of VRAM.
- SD 3.5 Large (
Starting tip: If your GPU has 6–8 GB of VRAM, start with ComfyUI or WEB UI (AUTOMATIC1111 / Forge) and use either the classic SD 1.5 or quantized versions of SDXL / SD 3.5 Medium.
Step-by-step guide to installing Stable Diffusion
There are several ways to install Stable Diffusion on a computer: a simple but feature-limited option using a graphical user interface, and a relatively complex manual installation that provides maximum flexibility.
What works on a PC with 6 GB of VRAM
Configuration used for testing:
-
CPU: Intel Core i5-12400F (2.5 GHz), RAM: 64 GB DDR4.
-
GPU: NVIDIA GeForce GTX 1660 SUPER (6 GB), storage: 1 TB NVMe SSD.
-
System: Windows 11 Pro (64-bit).
-
SD 1.5: Works excellently (512×512 generation takes seconds). You can freely use ControlNet, LoRA, and upscaling.
-
SDXL / SD 3.5 Medium: Will work, but slowly. With 6 GB of VRAM, launching with the
--medvram(or--lowvram) flag is mandatory, as is using quantized models (FP8 / GGUF). -
SD 3.5 Large: Can only be launched with heavy quantization (GGUF) through ComfyUI, and generation will take a long time.
Each OS has a free installer that allows you to install Stable Diffusion like a regular application: download the file and start the installation. If you need an automatic installer, choose one of the simple clients below.
Windows 11
There are two main ways to install Stable Diffusion on Windows: a simple out-of-the-box installation of a local application or a full installation through a universal manager.
Option 1: NMKD Stable Diffusion GUI (quick start with no configuration)
A simple portable Windows installer that does not require terminal usage.
- Installation process:
- Go to the official NMKD page at https://nmkd.itch.io/t2i-gui.
- Click the “Download” button. In the donation prompt that appears, select “No thanks, just take me to the downloads” to download it for free.
- Download the archive, extract it to any folder (for example,
C:\SD\NMKD), and runStableDiffusionGui.exe.
- Limitations: The program is updated infrequently, does not support many modern models (SDXL, SD 3.5, Flux), and has limited functionality compared with full-featured web interfaces.
Option 2: Stability Matrix (recommended choice for Windows)
If you need the full functionality of the neural network (ControlNet, LoRA, SDXL, and Flux support) without manually configuring Python and Git, use only Stability Matrix. This is the best solution for Windows today (step-by-step instructions are provided below).
macOS (Apple silicon M1/M2/M3/M4 and Intel)
Running Stable Diffusion on Apple computers has its own specifics: the neural network uses Unified Memory and the Apple Silicon graphics accelerator through the Metal API.
Option 1: Draw Things (recommended modern choice)
Draw Things is a free Mac App Store application fully optimized for macOS and M-series chips.
- Pros: Optimized for Apple chips and runs quickly, requires no command line, supports SD 1.5, SDXL, LoRA, ControlNet, and quantized versions of large models.
- Installation: Download it directly from the Mac App Store and launch it.
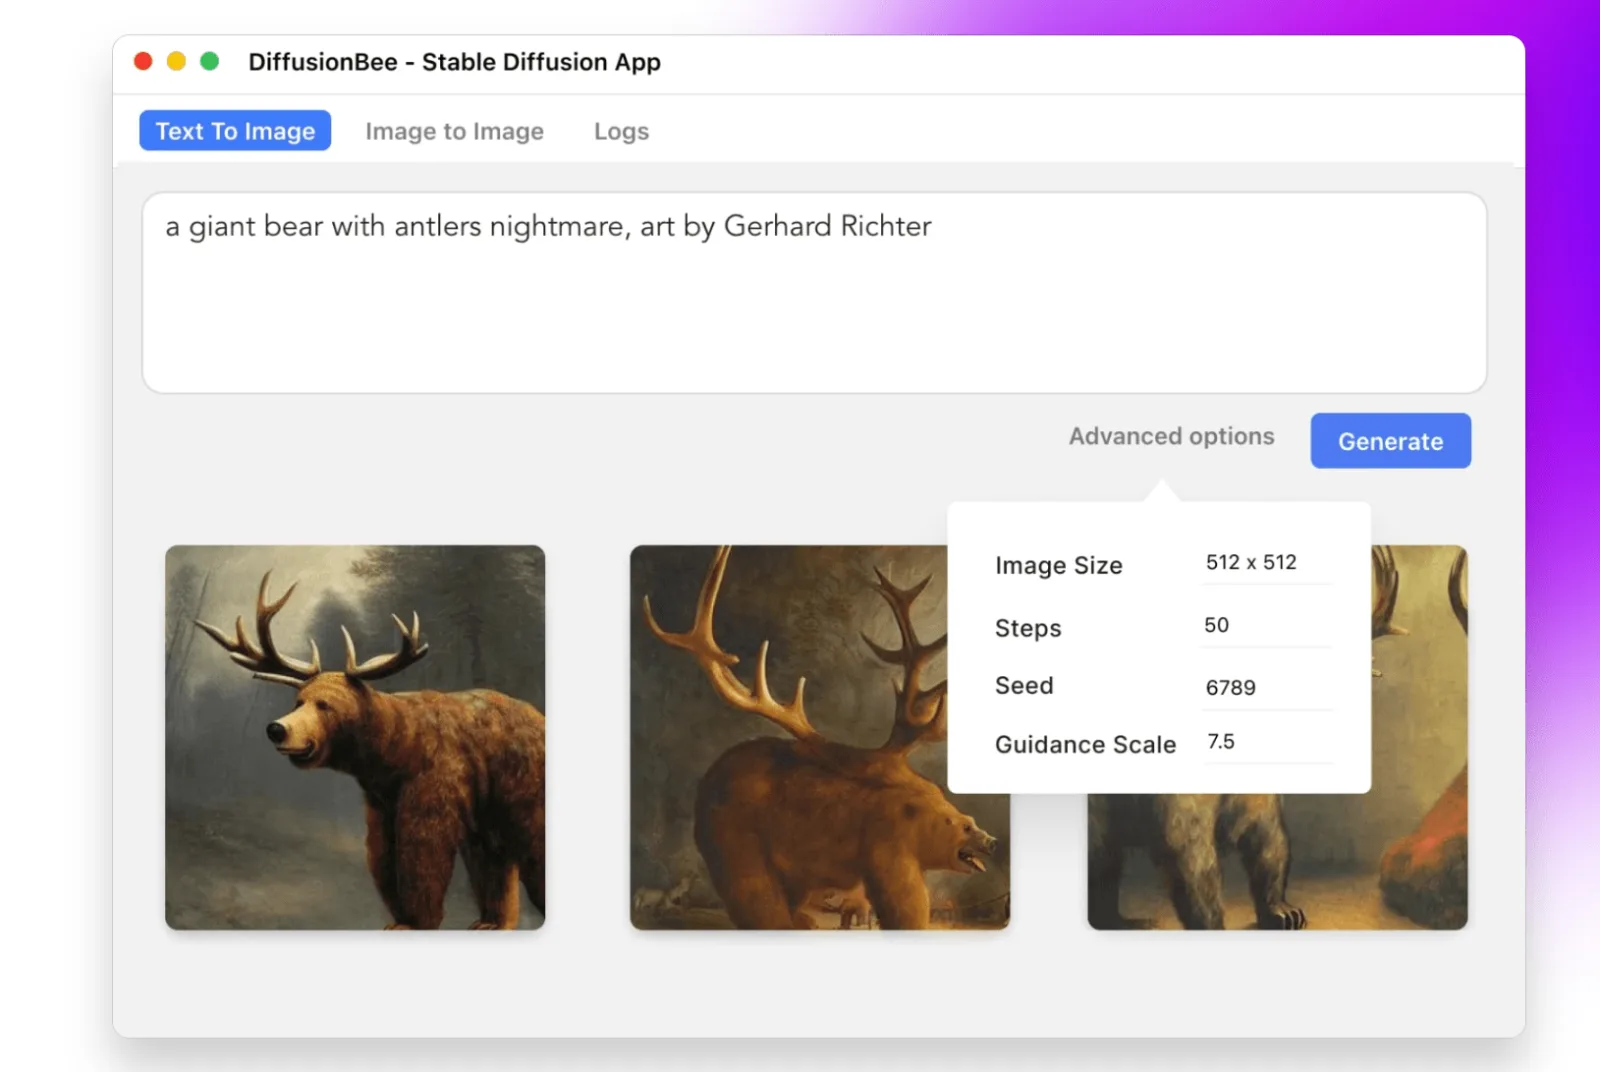
Option 2: DiffusionBee (simple start for beginners)
DiffusionBee remains an excellent option for complete beginners on Mac who want to launch a basic SD 1.5 setup with a single click. Installation process:
- Go to the official website and download the
.dmgfile. - Important: Choose the correct version: one for Apple Silicon processors (M1/M2/M3/M4) or one for older Intel Macs.
- Drag the application to the “Applications” folder.
Important: Development of the application has slowed down, its functionality is inferior to Draw Things, and generation runs extremely slowly on older Intel Macs without a discrete GPU. There is no Windows version of this application, and none is planned.
DiffusionBee lets you install the neural network on a Mac as easily as any other application. The result is a functional tool for unlimited image generation.
Linux (Ubuntu / Debian / Arch / Fedora)
Running Stable Diffusion on Linux delivers maximum performance: thanks to the clean NVIDIA CUDA stack and the absence of OS overhead, generation is usually faster here than on Windows.
Option 1: Easy Diffusion (the simplest one-click start)
Suitable for beginners who need a simple graphical interface without working with a Python environment.
- Features: Automatically downloads and configures all dependencies (Torch, CUDA, Python). Runs locally through a web interface in your browser (
localhost:9000). - Installation process:
- Download the Easy Diffusion ZIP archive for Linux from the official GitHub repository.
- Extract the archive to a separate folder.
- Open Terminal in this folder, make the script executable, and run it:
chmod +x start.sh ./start.sh - The installer will download the required components and open the interface in your browser.
Option 2: ComfyUI / SD WebUI Forge (recommended choice for Linux)
If you need full functionality (support for SDXL, SD 3.5, ControlNet, LoRA, and the latest models), install ComfyUI or Forge manually using git clone or through Stability Matrix (see below). On Linux, this process takes a couple of minutes and lets you get the most out of your GPU.
Automatic full Stable Diffusion installation via Stability Matrix (step-by-step)
Manual installation via Git and Python often leads to errors caused by dependency version conflicts. For a fast and reliable setup, it is better to use Stability Matrix—a universal cross-platform manager (Windows, Linux, and macOS on Apple Silicon; there is no Intel Mac version) that automatically deploys an isolated Python environment, Git, and the required libraries with a single click.
Main advantages of Stability Matrix:
-
Unified package manager: Lets you install and switch between any interfaces with a single click (ComfyUI, WebUI Forge, AUTOMATIC1111, Fooocus).
-
Shared model folder: All downloaded models (SD 1.5, SDXL, SD 3.5, and Flux checkpoints), LoRA, and ControlNet files are stored in a single directory and available to all installed interfaces simultaneously (there is no need to duplicate gigabytes of files).
-
Built-in catalog: Lets you search for and download models directly from Civitai and Hugging Face within the program.
Step-by-step installation process:
-
Download the installer: Go to the Stability Matrix repository on GitHub and, in the Releases section on the right, download the archive for your OS (for example,
StabilityMatrix-win-x64.zipfor Windows)._(⚠️ Do not download the source code via “Code → Download ZIP”—it is not the program, but development files). -
Extract and launch: Extract the archive to a folder with a short path containing no Cyrillic characters or spaces (for example,
C:\SD\StabilityMatrix) and launchStabilityMatrix.exe. -
Choose an interface: On the first launch, the program will prompt you to choose the primary graphical environment:
-
WebUI Forge — the optimal choice for modern PCs and GPUs with 6–8 GB of VRAM (maximum speed and memory efficiency). It is an updated version of the classic AUTOMATIC1111, optimized to reduce VRAM usage.
-
ComfyUI — for maximum speed and complex tasks; its interface consists of nodes (blocks) connected by lines. Downsides: It takes time to learn—there are no familiar “Generate” buttons here, and the workflow must be assembled manually or loaded from ready-made templates.
-
AUTOMATIC1111 — a classic interface with a huge number of third-party extensions, but it is demanding on VRAM.
-
-
Launch: Stability Matrix will automatically download the required versions of Python, PyTorch, and the dependencies. Once the process is complete, click Launch—the neural network will open and be ready to use.
What to do after installation
- Download and install models (checkpoints) from Civitai or Hugging Face.
- Add styles and characters via LoRA, and define the pose and composition using ControlNet.
- Build a prompt using ready-made prompt examples or prompt generators.
Frequently asked questions (FAQ) about installation and usage
How do I connect external scripts or code to WebUI Forge via the API?
The REST API is disabled by default. To send generation requests from Python, Node.js, or other programs:
- In Stability Matrix, close Forge and open the package settings (Launch Arguments).
- Enter the
--apiflag. - Launch the package. Documentation with all endpoints will be available at
http://127.0.0.1:7860/docs, while generation requests are sent via a POST request tohttp://127.0.0.1:7860/sdapi/v1/txt2img.
How do I fix the “Torch NOT FOUND” error or dependency loading failures?
If you use Stability Matrix, this error should not occur: the program creates isolated virtual environments for each interface automatically. If the launch still fails:
- In the Stability Matrix interface, go to the Packages section.
- Click the three dots next to the installed interface (for example, Forge or ComfyUI) and select Repair.
- If that does not help, make sure the program folder path contains no Cyrillic characters or spaces (for example,
C:\SD\StabilityMatrix, notC:\Новая папка\Нейросеть).
How do I open the local Stable Diffusion interface if the browser did not launch automatically?
After clicking Launch in Stability Matrix, a local web address will appear in the console:
- For WebUI Forge and AUTOMATIC1111:
http://127.0.0.1:7860 - For ComfyUI:
http://127.0.0.1:8188 - For Easy Diffusion:
http://127.0.0.1:9000
Simply copy this address into the address bar of any browser (Chrome, Edge, or Firefox).
What should I do if an “OutOfMemoryError” (CUDA out of memory) occurs during generation?
Your GPU does not have enough VRAM. For GPUs with 4–8 GB, do the following:
- For AUTOMATIC1111 / Forge: In Stability Matrix, open the package launch settings (Launch Arguments) and add the
--medvramflag (or--lowvramfor 4 GB GPUs). Other acceleration methods are covered in the article how to increase Stable Diffusion rendering speed. - For ComfyUI: Use quantized model versions in GGUF or FP8 format (you can download them directly through the Stability Matrix catalog).
I cannot solve the error—where can I get help?
Do not contact the developers through GitHub Issues—they only accept code bug reports, not configuration questions. It is better to seek help in relevant communities:
- Telegram chats dedicated to Stable Diffusion and ComfyUI.
- Themed threads on Reddit (
r/StableDiffusion).
Which installation method should you choose?
- For most users (Windows, Linux, macOS): Stability Matrix is the most convenient option in 2026. You get the full power of the neural network without restrictions, access to LoRA training, ControlNet support, and the ability to switch interfaces (ComfyUI / Forge) with a single click without risking system issues.
- For maximum simplicity on Mac: The Draw Things app from the App Store (if you do not want to work with package managers).
- For low-end PCs or if you need an image “right now”: Run it on a rented server with a GPU or generate images through web services from the AI catalog, so you do not burden your own hardware.

I study AI not as magic but as a tool. I love order in data and complex systems.