How to Use DeepSeek: API Key, Cline in VS Code, Command Line
Table of Contents
You can work with DeepSeek in four ways: in the website chat, in the mobile app, through the API, or by running the open model on your own computer. For developers, the most flexible option is the API: the key is entered in a code editor or console agent, and you only pay for the tokens you use. Below, we explain how to get a key, top up your balance, connect DeepSeek to Cline in VS Code, and run it from the command line and web interface through DeepSeek Harness (DSH). If you just need a chat without coding, see multi-chat clients; to choose among Chinese models, check out the best Chinese AI overview.
How Much It Costs
The main reason people choose DeepSeek for coding is its token pricing. The calculator screenshot shows a typical volume: 10 million input tokens and 2 million output tokens.
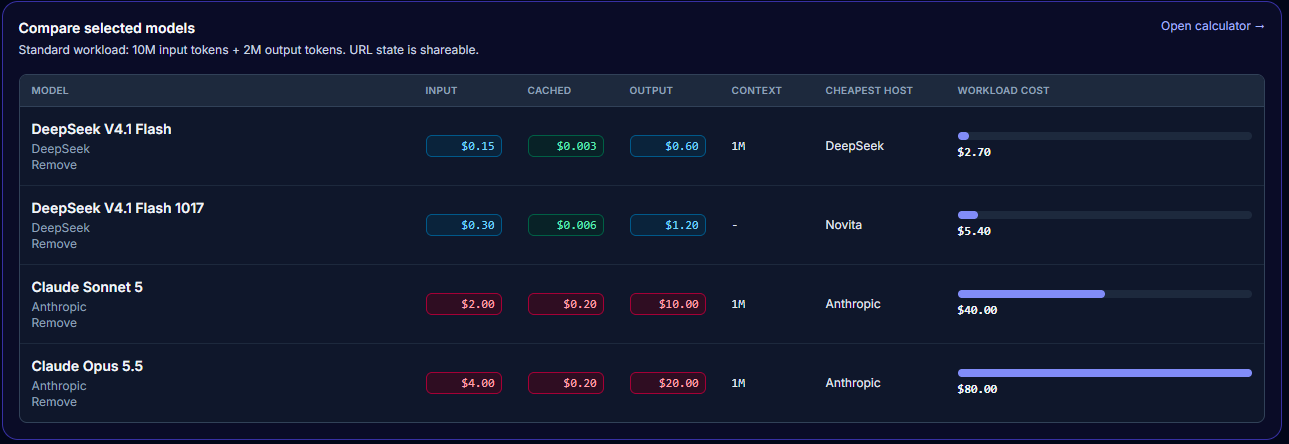
| Model | Input, $ per 1M | Output, $ per 1M | Cost for the volume |
|---|---|---|---|
| DeepSeek V4.1 Flash | 0.15 | 0.60 | $2.70 |
| DeepSeek V4.1 Flash 1017 | 0.30 | 1.20 | $5.40 |
| Claude Sonnet 5 | 2.00 | 10.00 | $40 |
| Claude Opus 5.5 | 4.00 | 20.00 | $80 |
The Flash 1017 version costs twice as much as standard Flash, but it is still several times cheaper than Sonnet and especially Opus. Prices change, so check the platform’s pricing page before topping up. For working with Anthropic models from restricted regions, see the article about (/knowledge/proksi-dlya-claude).
How to Get a DeepSeek API Key
Beginners most often confuse the regular chat website with the developer platform where keys are issued. The keys are available at platform.deepseek.com, not in the chat.
- Sign up. On the platform, click Sign Up. You can use an email address (which must be verified) or sign in with a Google or GitHub account. A phone number is not required.
- Create a key. Open API Keys in the left menu and click Create new API key. Give the key any name, such as
vscode-cline, and confirm its creation. - Save the key immediately. The platform will display a long string beginning with
sk-exactly once. Copy it to a password manager. A lost key cannot be recovered: you will have to delete it and create a new one. - Top up your balance. DeepSeek does not provide free trial tokens, and the key will not work while the balance is empty. Open Top Up in the left menu. The minimum top-up is $5; payment is available by Visa and Mastercard or through PayPal.
Which Cline to Install in VS Code
Cline is a VS Code extension that turns a model into an agent: it reads and edits project files and runs commands in the terminal. That is why the source of the extension matters. Unofficial forks can be found in the marketplace, including one from shengsuan-cloud: enthusiasts copy the open-source code, add buttons, and publish it under a similar name.
Install the official Cline extension published by cline.bot. It is an open-source project (formerly called Claude Dev) with built-in support for the DeepSeek API and regular security updates.
Connecting a DeepSeek Key to Cline
By default, Cline offers its own ClinePass subscription: the deepseek-v4-flash model is provided through their proxy rather than through your key. To pay DeepSeek directly, connect in BYOK mode (Bring Your Own Key).
- Click the Cline icon in the VS Code sidebar, then click the Settings gear at the top of the panel.
- Select DeepSeek from the API Provider list.
- Paste the
sk-…key into the DeepSeek API Key field. If the indicator below the field does not show an Invalid API Key error, the key has been accepted. - Select
deepseek-v4-flashfrom the Model list for everyday development, ordeepseek-v4-profor complex refactoring. - Click Done at the bottom of the panel, return to the chat, and submit your first task. If your balance is positive, the agent will respond.
Three interface details may look like errors but are not:
- 128K context. For
deepseek-v4-flash, Cline displays a 128K context window. This is an extension setting, not a limitation shown in the pricing calculator. - Prompt Caching: No. This is normal plugin behavior. DeepSeek input-token caching works on the API side, and the reduced cached-token price shown in the table above applies regardless of this label.
- Reasoning Effort. For models with a reasoning block, leave the setting at medium (
Medium): the code-analysis depth is sufficient, while tokens are not wasted.
Until you are comfortable with the agent, do not enable auto-approval. Let it request permission before running commands or editing files. Other models can be connected in VS Code in a similar way, for example Gemini.
Running DeepSeek Harness (DSH) from the Command Line
You can run DSH without a browser or web panel in pure console (headless CLI) mode directly from a PowerShell terminal. The instructions below are for Windows 11.
Step 1. Check Node.js
Open PowerShell and check the version:
node -vThe version must be v20.x, v22.x, or newer.
Step 2. Set the API Key in the PowerShell Session
Before launching the agent, pass the key obtained from platform.deepseek.com:
$env:DEEPSEEK_API_KEY="sk-your_real_key_here"The variable remains active until you close the current PowerShell window.
Step 3. Go to the Project Directory
The DSH agent works with the directory from which it is launched:
cd C:\path\to\your\projectStep 4. Launch the CLI Agent
To start an interactive console session without a web panel or browser, run:
npx @deepseek-ai/dsh --cliTo pass an initial task to the agent immediately:
npx @deepseek-ai/dsh --cli --prompt "Audit the files in the current folder and find syntax errors in PHP 8.5"CLI Mode Flags
| Flag | Description |
|---|---|
--cli |
Force console mode without opening a local web server. |
--auto-approve |
Automatically perform all file operations and run commands without manual confirmation (use with caution). |
--model deepseek-v4-flash |
Explicitly specify the model (deepseek-v4-flash is used by default). |
--model deepseek-v4-pro |
Switch the agent to a more advanced model for architecture and refactoring. |
How to Save the API Key Permanently in Windows
To avoid entering $env:DEEPSEEK_API_KEY every time you open PowerShell, save the key to the Windows user environment variables:
[System.Environment]::SetEnvironmentVariable("DEEPSEEK_API_KEY", "sk-your_real_key_here", "User")After running this command, restart PowerShell. The key will then be loaded automatically.
Running the DeepSeek Harness (DSH) Web Interface
In this mode, DSH launches a local server with a browser dashboard. It is convenient when you need to monitor the project tree and request history in parallel and approve file changes visually without cluttering the console.
What it provides:
- Visual diff. Code changes are highlighted like in Git (in green and red), which is more convenient when refactoring large PHP and JS files.
- File tree. Convenient selection of the working directory and the ability to restrict the agent’s access to a single project folder.
- Auto-approval settings. Agent permissions (allowing or denying bash commands and file edits) can be switched with one click.
Step 1. Pass the API Key to PowerShell
If the key has not yet been saved in the Windows environment variables, set it in the current session:
$env:DEEPSEEK_API_KEY="sk-your_real_key_here"Step 2. Start the DSH Web Server
npx @deepseek-ai/dsh webThe console will display http://127.0.0.1:3080 (or http://localhost:3080).
Step 3. Open the Interface in a Browser
- Open any browser and go to
http://localhost:3080. - In the window, click Choose Workspace and specify the path to the project folder, for example
C:\projects\my-app.
If port 3080 is already in use, specify another one:
npx @deepseek-ai/dsh web --port 8080To stop the server, press Ctrl + C in the PowerShell window where npx is running.
Instructions: Quick Step-by-Step Summary
- Sign up at platform.deepseek.com, create a key under API Keys, and save it immediately.
- Top up your balance by at least $5: the key will not work without it.
- Install only the official Cline extension (cline.bot), select the DeepSeek provider, and choose either
deepseek-v4-flashordeepseek-v4-pro. - To run it without an editor, use DeepSeek Harness:
npx @deepseek-ai/dsh --cliin the console ornpx @deepseek-ai/dsh webwith the web interface.

I study AI not as magic but as a tool. I love order in data and complex systems.