n8n guide: what it is and how to self-host it

Table of Contents
- Paid Cloud or free self-hosted?
- Installation options and database selection (SQLite vs PostgreSQL)
- Quick n8n VPS installation in 5 minutes
- Internet access and webhooks: domain, Nginx, and HTTPS
- Complete n8n setup: Python, sandboxing, and web search
- Backup
- How to update n8n to the latest version
- Conclusion: where to start and when you need a server with a GPU
- All n8n guides
n8n is a workflow automation platform. Imagine that you need to connect a Telegram bot, Google Sheets, a CRM system, and the OpenAI neural network so they can exchange data without your involvement. That is exactly the task n8n solves using visual blocks (nodes).
You simply drag and drop blocks on the screen, connect them with arrows, and get a ready-made workflow—from sending notifications to a chat to complex AI agents that make decisions.
Paid Cloud or free self-hosted?
If you visit the official n8n.io website, the first thing you will see is an offer of plans starting at €20 per month. This may give the impression that the service is entirely paid. In reality, n8n has two main versions:
-
n8n Cloud (Paid subscription): A ready-to-use cloud service from the creators. No setup is required, but limits are based on the number of workflow executions. For example, the entry-level Starter plan (€20 per month when billed annually) includes 2,500 executions per month and up to 5 concurrent runs. At higher volumes, this becomes expensive.
-
n8n Community / Self-Hosted (Free version): An open-source version (fair-code, Sustainable Use License) that you can install completely free of charge on your own VPS. There are no limits on the number of workflows or executions—you only pay the fixed cost of renting your server, usually $4–$6 per month. Some enterprise features (SSO, advanced access controls, and so on) are available only under a paid license, but they are not required for automations and AI agents.
What you can and cannot do under the Sustainable Use License
n8n’s code is open, but this is not traditional open source like MIT; it uses a fair-code model. The license (text on GitHub) states the main restriction as follows: n8n may be used and modified only for your company’s internal purposes, as well as for non-commercial or personal purposes. You may provide n8n to others only free of charge and for non-commercial purposes.
In practice, this means:
- Allowed: Automating your company’s processes (CRM, leads, reports, Telegram bots, AI agents), building personal projects, and modifying the code for your own needs (with a notice describing the changes made).
- Not allowed without a commercial license: Selling access to your n8n instance to other people, presenting it as your own product (white-labeling), or embedding it into a paid SaaS service.
Files with .ee. in their names are separate—they contain enterprise features and work only with a paid Enterprise key.
What is included in the free Community Edition
Without a license key, n8n runs in the free Community Edition. It includes almost everything: all nodes and integrations, AI agents, webhooks, schedules, an unlimited number of workflows and executions, logging, and even queue mode for scaling.
The only missing features are intended for teams and enterprises:
- projects and shared access to workflows and credentials—they are visible only to the instance Owner and the author;
- additional administrators (the Admin role), which is why you see the message “Upgrade to unlock the ability to create additional admin users”;
- SSO login (SAML, LDAP);
- global variables, External secrets, and external file storage;
- environments and version control through Git;
- Log streaming to external systems and Multi-main mode.
Free key: registered Community Edition
You can register the Community Edition for free—n8n will send a license key to your email. It unlocks three additional features:
- Folders—workflows can be organized into folders, which is convenient once their number exceeds a dozen.
- Debug in editor—data from a previous execution can be copied into the editor and pinned so you can reproduce and troubleshoot an error.
- Custom execution data—you can add your own labels and metadata to executions and then search by them.
How to get the key:
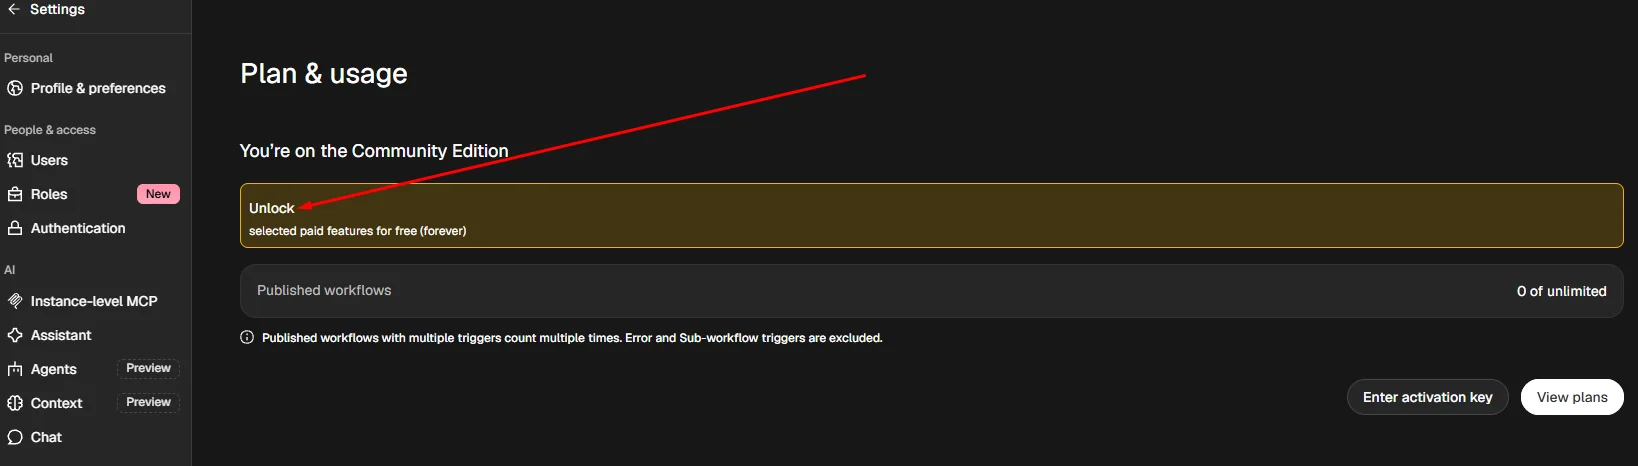
- In the n8n panel, click the three dots in the bottom-left corner → Settings → Usage and plan.
- Click Unlock, enter your email address, and select Send me a free license key.
- Open the email from n8n and click the activation button. Alternatively, copy the key from the email and enter it in the same section using Enter activation key.
A new instance offers the same option directly during admin account creation. The key is free and does not change the license: it does not unlock the Admin role, projects, or other enterprise features. Those require a paid Business or Enterprise plan.
Installation options and database selection (SQLite vs PostgreSQL)
You can deploy n8n on your server in several ways: via Node.js (npm), in a Docker container, or through Docker Compose. The simplest option to isolate and maintain is Docker Compose. The developers have announced that npm-based installation is deprecated.
Why is SQLite sufficient for getting started?
The official documentation often recommends connecting an external PostgreSQL database. It is indeed required for high-load production environments with hundreds of parallel requests per minute because it can process heavy task queues concurrently.
However, the built-in SQLite database is ideal for most projects, testing, and working with AI agents:
-
Zero configuration: You do not need to launch a separate database container, create users, or configure access credentials.
-
Resource efficiency: SQLite does not remain in memory as a separate service. n8n itself consumes around 450–500 MB of RAM when idle, so a VPS with 2 GB of RAM is a comfortable minimum.
-
Simple backups: Your entire database consists of several files in a single directory.
Quick n8n VPS installation in 5 minutes
You will need a VPS running Ubuntu or Debian, with 2 GB of RAM and at least 5 GB of free disk space (the n8n image alone takes up around 2 GB).
If you do not want to install everything manually, check out this selection of VPS providers with n8n preinstalled: providers are sorted by price, and n8n is deployed when you order the server.
This guide was tested in November 2026 on Ubuntu 24.04, Docker 29.9, and n8n 2.46.
Step 1. Install Docker
Connect to the server over SSH. If Docker is not installed yet, install it using the official script:
curl -fsSL https://get.docker.com | shMake sure Docker and the Compose plugin are available:
docker --version && docker compose version
Docker version 29.9.3, build 5457199
Docker Compose version v5.7.0
Step 2. Create a working directory
mkdir -p ~/n8n && cd ~/n8nStep 3. Create the docker-compose.yml file
Run nano docker-compose.yml and paste the following minimal manifest:
services:
  n8n:
    image: docker.n8n.io/n8nio/n8n:latest
    container_name: n8n
    restart: unless-stopped
    ports:
      - "127.0.0.1:5678:5678"
    environment:
      - GENERIC_TIMEZONE=Europe/Kyiv
      - TZ=Europe/Kyiv
      - N8N_ENFORCE_SETTINGS_FILE_PERMISSIONS=true
    volumes:
      - n8n_data:/home/node/.n8n

volumes:
  n8n_data:
(Save the file with Ctrl+O → Enter, then exit with Ctrl+X.)
What matters here:
127.0.0.1:5678:5678—the n8n panel is accessible only from the server itself. This is intentional: Docker publishes ports bypassing the firewall (ufw), and the"5678:5678"line would expose your panel to the entire internet. Step 5 explains how to access the panel.container_name: n8n—a fixed container name that is convenient to use in commands.GENERIC_TIMEZONEandTZ—the time zone used for schedules (the Schedule Trigger node). Specify your own time zone in the IANA database format, such asEurope/KyivorAsia/Almaty. Both variables must be changed. If n8n is already running, executedocker compose up -dafter editing the file: Docker will recreate the container with the new time zone while preserving the data. To verify it, rundocker exec n8n date; it will display the time in the new time zone. For an individual workflow, you can override the time zone in its settings (Workflow settings → Timezone).N8N_ENFORCE_SETTINGS_FILE_PERMISSIONS=true—n8n ensures that theconfigfile containing the encryption key is accessible only to n8n itself (permissions600). In n8n 2.x, this check is already enabled by default; the line is included for clarity and for older 1.x versions, where n8n would only write a warning to the log without it.restart: unless-stopped—the auto-start directive. It ensures that n8n automatically starts after a VPS reboot or if the process crashes. The container will not start automatically in only one case—if you stopped it manually with thedocker compose stopcommand.
Step 4. Start n8n
docker compose up -dWhat happens under the hood: Docker downloads the official n8n image, creates the n8n_data Docker Volume with the SQLite database inside, and starts the service in the background. The first launch takes 20–30 seconds.
Verification:
curl -s http://localhost:5678/healthzThe {"status":"ok"} response means that n8n is running.
Step 5. Open the panel through an SSH tunnel
On your own computer (Windows PowerShell, macOS, or Linux), run:
ssh -L 5678:localhost:5678 root@YOUR_SERVER_IPWhile this window remains open, the n8n panel is available in your browser at http://localhost:5678. You will see the admin account creation screen—the installation is complete.
Why not http://YOUR_SERVER_IP:5678? Modern n8n versions issue login cookies only over secure connections by default (the Secure flag). A browser will not save the cookie over a plain HTTP address, and n8n will display a secure-cookie warning instead of the login screen. Browsers treat localhost as secure, so everything works through the tunnel without additional configuration.
Internet access and webhooks: domain, Nginx, and HTTPS
A tunnel is sufficient for building workflows and running them on a schedule. But if external services need to connect to n8n themselves (a Telegram bot, CRM webhooks, payment systems), you need a domain and HTTPS. The setup is as follows: n8n continues listening only on 127.0.0.1:5678, while Nginx is exposed to the outside world—it accepts HTTPS requests on the domain and forwards them to n8n.
In the examples below, the domain is n8n.example.com—replace it with your own.
Step 1. Point the domain to the server
At your domain registrar or in Cloudflare, create an A record for the n8n subdomain with your VPS's IP address (and an AAAA record with the IPv6 address, if available).
Step 2. Install Nginx
apt install -y nginxStep 3. Create the site configuration
Run nano /etc/nginx/sites-available/n8n.example.com.conf and insert:
map $http_upgrade $connection_upgrade {
    default upgrade;
    ''      close;
}

server {
    listen 80;
    listen [::]:80;
    server_name n8n.example.com;

    location / {
        proxy_pass http://127.0.0.1:5678;
        proxy_http_version 1.1;
        proxy_set_header Host $host;
        proxy_set_header Upgrade $http_upgrade;
        proxy_set_header Connection $connection_upgrade;
        proxy_set_header X-Real-IP $remote_addr;
        proxy_set_header X-Forwarded-For $proxy_add_x_forwarded_for;
        proxy_set_header X-Forwarded-Proto $scheme;
        proxy_buffering off;
        proxy_read_timeout 3600s;
        client_max_body_size 50m;
    }
}
What matters here:
proxy_http_version 1.1— the protocol version used only between Nginx and n8n inside the server. By default, Nginx communicates with n8n over HTTP/1.0, while WebSocket works only with HTTP/1.1 or later. Theproxymodule in Nginx does not support HTTP/2 for this connection, and it provides no benefit within a single server anyway. Visitors' browsers can still connect over HTTP/2 or HTTP/3: this is configured separately on the external side, in Nginx's HTTPS block or in Cloudflare.UpgradeandConnection— n8n updates the editor in real time via WebSocket. Without these headers, workflows will run, but the interface will not display the result.proxy_buffering offandproxy_read_timeout 3600s— long-running responses, such as streaming output from an AI agent, will not be terminated after 60 seconds.client_max_body_size 50m— files can be uploaded through webhooks (by default, Nginx allows only 1 MB).
Enable the site and test the configuration:
ln -s /etc/nginx/sites-available/n8n.example.com.conf /etc/nginx/sites-enabled/
nginx -t && systemctl reload nginx
Step 4. Obtain an HTTPS certificate
Option A: Domain without Cloudflare. Certbot will issue a free Let's Encrypt certificate. It will automatically add an HTTPS block and an HTTP redirect to the configuration and renew the certificate:
apt install -y certbot python3-certbot-nginx
certbot --nginx -d n8n.example.com --email [email protected] --agree-tos --redirect
Before that, open ports 80 and 443 in the firewall: ufw allow 80,443/tcp.
Option B: Domain behind Cloudflare (orange cloud). Cloudflare itself provides a valid certificate to visitors, so a self-signed certificate is sufficient on the server:
mkdir -p /etc/ssl/n8n
openssl req -x509 -nodes -newkey rsa:2048 -days 3650 \
  -subj "/CN=n8n.example.com" -addext "subjectAltName=DNS:n8n.example.com" \
  -keyout /etc/ssl/n8n/n8n.key -out /etc/ssl/n8n/n8n.crt
In the configuration, replace listen 80; and listen [::]:80; with:
    listen 443 ssl http2;
    listen [::]:443 ssl http2;
    ssl_certificate     /etc/ssl/n8n/n8n.crt;
    ssl_certificate_key /etc/ssl/n8n/n8n.key;
Then run nginx -t && systemctl reload nginx.
In the SSL/TLS section of the Cloudflare dashboard, the mode must be set to Full (with Full (strict), Cloudflare will not accept a self-signed certificate and will return error 526). It is sufficient to open ports 80 and 443 only for Cloudflare IP addresses:
for n in $(curl -s https://www.cloudflare.com/ips-v4) $(curl -s https://www.cloudflare.com/ips-v6); do
  ufw allow proto tcp from $n to any port 80,443 comment cloudflare
done
This prevents the server from being accessed directly, bypassing Cloudflare. To make n8n see visitors' actual IP addresses instead of Cloudflare addresses, add set_real_ip_from directives for each Cloudflare network and real_ip_header CF-Connecting-IP; to the server block.
Step 5. Tell n8n its address
Add four new lines to the environment section of docker-compose.yml (the last lines in the block); leave the rest unchanged:
    environment:
      - GENERIC_TIMEZONE=Europe/Kyiv
      - TZ=Europe/Kyiv
      - N8N_ENFORCE_SETTINGS_FILE_PERMISSIONS=true
      - N8N_HOST=n8n.example.com
      - N8N_PROTOCOL=https
      - WEBHOOK_URL=https://n8n.example.com/
      - N8N_PROXY_HOPS=1
Then restart the container:
cd ~/n8n && docker compose up -dWEBHOOK_URL— without it, n8n will provide external services with incorrect webhook URLs (http://localhost:5678/...).N8N_PROXY_HOPS=1— n8n knows that it is behind a proxy and takes the visitor's IP address from theX-Forwarded-Forheader.
Leave the port mapping in the manifest as 127.0.0.1:5678:5678: all external traffic goes through Nginx.
Check: open https://n8n.example.com—the n8n login page will appear over a secure connection. In any Webhook node, the address will now start with https://n8n.example.com/webhook/....
Security: the n8n panel is now visible to the entire internet. Set a long, unique password for the administrator and enable two-factor authentication in the personal settings (Settings → Personal).
Complete n8n setup: Python, sandboxing, and web search
The setup described above consists of a single n8n container. It is sufficient for standard automation: all nodes and integrations, webhooks, schedules, the AI Agent node, and JavaScript in the Code node. However, some newer n8n features do not work with this setup. For them, the developers provide an official set of containers:
| Container | What it provides |
|---|---|
n8n |
n8n itself |
runners |
Executes code from the Code node in a separate container: JavaScript and Python |
sandbox-api, sandbox-runner-1 |
Sandbox: an isolated environment where the AI assistant and new n8n Agents execute code and work with files |
searxng |
Your own SearXNG search engine: web search for the AI assistant without paid APIs |
sandbox-certs |
A one-time container that creates certificates for communication between n8n and the sandbox, then exits |
When you need the complete setup
- You need Python in the Code node (the minimal setup supports JavaScript only).
- You use the AI assistant and n8n Agents, which write and run code, search the web, and process files on their own.
- n8n runs in production: user code executes separately from n8n itself, so an error in a workflow will not bring down the entire service.
If you are building standard workflows (a Telegram bot, spreadsheets, a CRM, requests to AI services), the complete setup is not required—the minimal setup is sufficient.
Recommended VPS specifications
- 2 vCPUs, 4 GB RAM, 20 GB of disk space (SSD/NVMe)—this is the minimum specified in the official documentation.
- When idle, the entire setup uses around 700 MB of memory, but the sandbox starts a separate container for each task, so usage increases under load.
- The images occupy approximately 4 GB of disk space.
Installation
The easiest way to install the setup is with the official script. It downloads compose.yml, creates a .env file with unique passwords for inter-container communication, and configures search. The --no-start flag is required so that you can edit the manifest before starting the containers:
curl -fsSL https://get.n8n.io -o get-n8n.sh
N8N_DIR=~/n8n sh get-n8n.sh --no-start
The script will refuse to run if ~/n8n already exists and is not empty. To migrate from the minimal setup, specify a different directory or create a backup first.
Then open ~/n8n/compose.yml and make two changes (they have already been applied in the example below):
- n8n port: replace
'5678:5678'with"127.0.0.1:5678:5678"—for the same reason as in the minimal setup (Docker bypasses the firewall). - Add
restart: unless-stoppedto every service exceptsandbox-certs. This line is missing from the official file, so n8n will not start automatically after a VPS reboot.
Add the time zone to the end of ~/n8n/.env:
GENERIC_TIMEZONE=Europe/Kyiv
TZ=Europe/Kyiv
The resulting compose.yml (the n8n and sandbox versions, as well as all passwords, are taken from .env):
volumes:
  n8n-data:
  sandbox-tls:

services:
  sandbox-certs:
    image: ghcr.io/n8n-io/n8n-sandbox-service-api:${N8N_SANDBOX_VERSION}
    user: '0:0'
    entrypoint: ['sh', '-c']
    command:
      - >
        bootstrap-mtls.sh --out-dir /tls --api-san sandbox-api
        --control-san-prefix sandbox-runner --world-readable &&
        chown -R sandbox-api:sandbox-api /tls/api && chmod -R a+rX /tls
    environment:
      NUM_RUNNERS: '1'
    volumes:
      - sandbox-tls:/tls

  sandbox-api:
    image: ghcr.io/n8n-io/n8n-sandbox-service-api:${N8N_SANDBOX_VERSION}
    restart: unless-stopped
    depends_on:
      sandbox-certs:
        condition: service_completed_successfully
    env_file: .env
    environment:
      SANDBOX_API_GRPC_TLS_CERT_FILE: /tls/api/grpc-server.crt
      SANDBOX_API_GRPC_TLS_KEY_FILE: /tls/api/grpc-server.key
      SANDBOX_API_GRPC_TLS_CLIENT_CA_FILE: /tls/api/ca.crt
      SANDBOX_API_RUNNER_CONTROL_GRPC_TLS_CA_FILE: /tls/api/ca.crt
      SANDBOX_API_RUNNER_CONTROL_GRPC_TLS_CERT_FILE: /tls/api/control-grpc-api-client.crt
      SANDBOX_API_RUNNER_CONTROL_GRPC_TLS_KEY_FILE: /tls/api/control-grpc-api-client.key
      SANDBOX_API_RUNNER_CONTROL_GRPC_TLS_SERVER_NAME: sandbox-runner-1
    volumes:
      - sandbox-tls:/tls:ro
    healthcheck:
      test: ['CMD', 'wget', '-qO-', 'http://localhost:8080/healthz']
      interval: 5s
      timeout: 3s
      retries: 5
      start_period: 10s

  sandbox-runner-1:
    image: ghcr.io/n8n-io/n8n-sandbox-service-runner-dind:${N8N_SANDBOX_VERSION}
    restart: unless-stopped
    privileged: true
    depends_on:
      sandbox-api:
        condition: service_healthy
    env_file: .env
    environment:
      SANDBOX_RUNNER_API_GRPC_ADDR: sandbox-api:9090
      SANDBOX_RUNNER_HTTP_BASE_URL: https://sandbox-runner-1:8080
      SANDBOX_RUNNER_CONTROL_GRPC_LISTEN_ADDR: ':9091'
      SANDBOX_RUNNER_CONTROL_GRPC_ADVERTISE_ADDR: sandbox-runner-1:9091
      SANDBOX_RUNNER_ID: runner-1
      SANDBOX_RUNNER_DOCKER_SANDBOX_IMAGE: ghcr.io/n8n-io/n8n-sandbox-service-sandbox:${N8N_SANDBOX_VERSION}
      SANDBOX_RUNNER_REGISTRATION_GRPC_CA_FILE: /tls/runner/ca.crt
      SANDBOX_RUNNER_REGISTRATION_GRPC_CERT_FILE: /tls/runner/grpc-client.crt
      SANDBOX_RUNNER_REGISTRATION_GRPC_KEY_FILE: /tls/runner/grpc-client.key
      SANDBOX_RUNNER_REGISTRATION_GRPC_SERVER_NAME: sandbox-api
      SANDBOX_RUNNER_CONTROL_GRPC_TLS_CERT_FILE: /tls/runner/control-grpc-server.crt
      SANDBOX_RUNNER_CONTROL_GRPC_TLS_KEY_FILE: /tls/runner/control-grpc-server.key
      SANDBOX_RUNNER_CONTROL_GRPC_TLS_CLIENT_CA_FILE: /tls/runner/ca.crt
    volumes:
      - sandbox-tls:/tls:ro

  n8n:
    image: docker.io/n8nio/n8n:${N8N_VERSION}
    restart: unless-stopped
    depends_on:
      sandbox-api:
        condition: service_healthy
    ports:
      - "127.0.0.1:5678:5678"
    env_file: .env
    volumes:
      - n8n-data:/home/node/.n8n

  runners:
    image: ghcr.io/n8n-io/runners:${N8N_VERSION}
    restart: unless-stopped
    depends_on:
      - n8n
    environment:
      N8N_RUNNERS_AUTH_TOKEN: ${N8N_RUNNERS_AUTH_TOKEN}
      N8N_RUNNERS_TASK_BROKER_URI: http://n8n:5679
      N8N_RUNNERS_AUTO_SHUTDOWN_TIMEOUT: '15'

  searxng:
    image: ghcr.io/searxng/searxng:latest
    restart: unless-stopped
    environment:
      SEARXNG_SECRET: ${SEARXNG_SECRET}
    volumes:
      - ./searxng-settings.yml:/etc/searxng/settings.yml:ro
Start it as before, but note that the first startup takes longer (approximately 4 GB of images will be downloaded; this takes 1–3 minutes):
cd ~/n8n && docker compose up -dCheck: docker compose ps should show five containers with the Up status (sandbox-certs exits on its own, which is normal). Access the UI through an SSH tunnel or a domain, as described above. For a domain, add the N8N_HOST, N8N_PROTOCOL, WEBHOOK_URL, and N8N_PROXY_HOPS variables to .env in the NAME=value format.
Important considerations
- The sandbox runs with elevated privileges (
privileged: true, Docker-in-Docker). Never expose the ports of its containers to the public internet. If running such a container on your server is undesirable, you can connect to the cloud-based Daytona instead using a separate account. - Python in the Code node does not allow
importby default, including imports of standard-library modules: a script containingimport jsonwill fail with the “Security violations detected” error. This is a security measure; allowed modules are configured in the runner settings using theN8N_RUNNERS_STDLIB_ALLOWvariable. - Backup: the volume is named
n8n_n8n-data(notn8n_n8n_data), and you also need to back up the.envfile containing the passwords. Stop and archive it as described in the section below, using this volume name. - Update:
N8N_DIR=~/n8n sh get-n8n.sh --upgrade. The script updates the n8n and sandbox versions in.env, downloads the images, and restarts the containers. A simpledocker compose pullwill not update the version here because it is pinned in.env.
Backup
All your workflows, credentials, and API keys are stored in the n8n_data volume. Backups should be created regularly and are mandatory before every update.
It is important to copy the entire volume directory, not just the database.sqlite file:
- n8n uses SQLite in WAL mode: the latest changes are stored in the adjacent
database.sqlite-walfile, so the database backup will be incomplete without it; - the encryption key is stored in the
configfile. Without it, passwords and API keys saved in n8n cannot be decrypted, even from a complete database.
Step 1. Create a backup directory
mkdir -p ~/n8n_backupsStep 2. Stop n8n and archive the volume
cd ~/n8n
docker compose stop
docker run --rm -v n8n_n8n_data:/data:ro -v ~/n8n_backups:/backup alpine tar czf /backup/n8n_$(date +%Y%m%d_%H%M%S).tar.gz -C /data .
docker compose start
_The volume name n8n_n8n_data is formed from the project directory name (n8n) and the volume name from the manifest (n8n_data). The exact name can be displayed with the docker volume ls command._
Stopping n8n takes a few seconds, but this guarantees that the database copy is consistent.
Check: run ls -lh ~/n8n_backups—an archive such as n8n_20261108_102200.tar.gz should appear. Do not store backups only on the same server: download the archive locally or upload it to cloud storage.
How to restore from a backup
cd ~/n8n
docker compose down
docker run --rm -v n8n_n8n_data:/data -v ~/n8n_backups:/backup alpine sh -c "rm -rf /data/* && tar xzf /backup/n8n_20261108_102200.tar.gz -C /data"
docker compose up -d
(Replace the archive name with your own.) After startup, log in to n8n with your old username and password—all workflows and connections will be restored.
How to update n8n to the latest version
One of the main advantages of deploying n8n with Docker Compose is how simple updates are. The data is stored in a separate n8n_data volume, so it persists when the container is replaced.
Create a backup before updating (see the section above).
Step 1. Change to the project directory
cd ~/n8nStep 2. Download the latest n8n image
docker compose pullDocker will compare your current n8n version with the latest version in the official registry and download the new image.
Step 3. Restart the container
docker compose up -dDocker Compose will automatically stop the old container and start a new one with the updated n8n version.
Check: run docker compose ps—the container status should be Up. The version number can be displayed with docker exec n8n n8n --version.
Tip: the latest tag always pulls the most recent stable version, including major updates that may change node behavior. If your n8n instance is running in production, specify an exact version in the manifest (for example, docker.n8n.io/n8nio/n8n:2.46.6) and upgrade it manually after reading the release notes.
Old images continue to consume disk space after updates and can be removed with the docker image prune command.
Conclusion: where to start and when you need a server with a GPU
For most tasks, the setup described in this article is sufficient: the free Community Edition running in Docker, an SQLite database, and an affordable VPS with 2 GB of RAM. There are no limits on scenarios or executions, and n8n connects to AI models such as ChatGPT, Claude, or Gemini via API: the model itself runs on the provider’s side, so you do not need a powerful server for this. Once your first workflows are up and running, move on to AI agents in n8n.
A separate use case is running local AI on the same server as n8n. This is useful when data (customer conversations, documents, and internal databases) cannot be sent to external services, or when the number of model requests is so high that paying for API access costs more than renting a server. n8n provides Ollama nodes for this purpose: the language model runs in a neighboring Docker container, while n8n accesses it like a regular Chat Model node. The n8n developers provide a ready-made Self-hosted AI Starter Kit: n8n, Ollama, the Qdrant vector database, and PostgreSQL in a single docker-compose.yml.
A regular VPS is not sufficient for running a local model: response generation on a CPU is very slow. You need an NVIDIA GPU and the NVIDIA Container Toolkit package so that Docker can access it. Models with 7–8 billion parameters fit into 8 GB of VRAM in compressed (quantized) form; models with 30 billion parameters or more require at least 24 GB. You can choose a server with a GPU for n8n and a local AI model on our homepage: it features GPU hosting plans, a GPU model filter, and prices.
All n8n guides

I study AI not as magic but as a tool. I love order in data and complex systems.